Chocolate and Walnut Tart with Toffee Sauce

When I wrote this recipe for my newspaper column the correct photo did not appear, due to an intern who had been out celebrating his birthday late the night before. So reposting it here is a chance for me to share with you the recipe as it was meant to appear.
If you're a follower of this blog you will know I love contrasts, whether that is sweet and sour or a contrast of textures like soft and crunchy.
With this tart, I've added cocoa powder to the pastry for maximum chocolate flavour.The dark richness of the chocolate is contrasted well with the walnuts and the moreish mellow toffee sauce.
Ingredients: (serves eight)
Pastry
120g (4 ½ oz) softened butter
1 medium egg
9Og (3 ½ oz) caster sugar
200g (8oz) plain flour
5og (2oz) cocoa powder
Filling
2 tsp seedless raspberry jam
150g (6oz) walnuts roughly chopped
200g (8oz) good plain chocolate
60g (2 ½ oz) softened butter
100g (4oz) caster sugar
4 eggs
Method
1. To make the pastry, rub the flour, cocoa powder and butter together until it is a fine crumb consistency.
2. Break the egg into a separate bowl, add the sugar and beat
3. Gradually add the egg mix to the pastry, working it gently just until it comes together, then cling wrap it and place in your fridge for 15 minutes to rest.
4. In the meantime lightly butter a 10-inch quiche dish (use a ceramic one if possible).
5. Gently roll out the chocolate pastry to a thickness of 4mm on a lightly floured surface, then line the quiche dish with the pastry. Trim off any excess pastry and keep*.
6. Chill the pastry shell down in the fridge for 30 minutes, then gently brush the base with the seedless raspberry jam. Now gently lay the walnuts on top of the jam and refrigerate again.
7. Preheat your oven to 180 C/350F gas mark 4
8. Separate the eggs you have saved for the filling, yolks in one bowl and whites in another.
9. Add the 100g (4oz) caster sugar to the yolks and whisk with an electric whisk until the yolks have turned pale and fluffy.
10. Whisk the egg whites until very stiff.
11. Melt the chocolate over a pan of hot water, then remove from the heat as soon as it's fully melted.
12. Allow the melted chocolate to cool for just 1-2 minutes then slowly fold the yolk mixture in. Then fold the egg whites in and then pour the filling evenly over the walnuts and smooth with a palette knife if necessary.
13. Use your saved pastry scraps to make a lattice pastry top.
14. Bake
15. Taste the tart with a toothpick and when it comes out clean remove the tart from the oven.
Toffee Sauce
Making toffee sauce is easier than most people think just keep an eye on it and be sure to use a
200g (8oz) granulated sugar
½ vanilla pod
142ml (1/4 pint of double cream/heavy cream
150ml (1/4 pint + 1 Tbsp) of water
50g (2oz) butter, cold chilled pieces
1. Combine the sugar the water into a heavy-bottomed stainless steel saucepan and bring to a gentle simmer on a medium heat. If you see any sugar crystals forming on the insides of the pan then use the wet pastry brush and "paint" the inside of the pan to dissolve the crystals back into the liquid.
2. Simmer on a medium heat until the syrup becomes a light golden brown then take the saucepan off the heat
3. Now stir in the butter and scrap and add the vanilla seeds to enrich the flavour.
To Serve
Serve the tart warm with the toffee sauce a small scoop of vanilla ice cream.
Chef's Tip
To maximise the contrasts in this dish, scoop the vanilla ice cream into
©Kevin Aston 2006-2015
In the Kitchen with Kevin Ashton

This is an interview by Foodies 100 was published on July
ただ、面接に行くために写真をクリックしてください
L'art de la Table-Cookbook review

Besides the recipes, Gintare shows another creative side with her wonderful atmospheric photography that sets the scene and draws you in, as do her little vignettes spreading sunshine to the pages. レビューに行くために写真をクリック :)
Tian of Avocado and Crab with Gazpacho

Gazpacho Andaluz is one of my earliest childhood memories of Spain. At the tender age of eleven on my first package holiday to the quaint seaside resort of Tossa de Mar. It didn't matter that the Costa Brava was nowhere near Andalusia, just that I was on my first foreign holiday and my parents encouraged us to try the more Spanish dishes on offer. I also remember other British holidaymakers in the dining room complaining that the food was too foreign.
Years later during the summer
Gazpacho Ingredients (serves 4)
400g vine ripe tomatoes
1-2 slices of stale white bread
2 dessertspoons of red-wine vinegar
1 clove fresh garlic, peeled and crushed
1 medium-grilled red pepper (or use tinned)
1/2 cucumber, peeled and the seeds removed
75ml olive oil
1/2-pint tomato juice or passata
1 dessertspoon tomato puree
125ml ice water
Tian Ingredients (serves 4)
2 small ripe avocados, peeled and sliced
240g white crab meat
Cajun spices
1.Blanch tomatoes in boiling water for 10-15 seconds to remove the skin.
2.Place the stale bread in food processor and chop until it is fine crumbs.
3.Add garlic then stir in red-wine vinegar. Chargrill red pepper on hob, turning
frequently until all sides are charred, and then cling wrap.
4.After five minutes, unwrap pepper and rinse away charred skin under cold water.
5.Cut the pepper in half, then quarters, carefully removing seeds and membrane. 6.Gradually add olive oil to crumbs until fully absorbed, then add the tomatoes, cucumber and red pepper and process until fine.
7.Add tomato juice and tomato puree, then season with salt and pepper.
8.Pass the soup through a fine sieve to make it very smooth, then refrigerate. 9.Remember, the soup should be served very cold and can be thinned down with ice water if it is too thick.
10.To make the
To Serve *Use 9inch (23cm) small rimmed soup bowls, like these.
Gently ladle the gazpacho around the ring, being careful not to drip onto the tian (fill each soup bowl approximately half full). Slowly and carefully remove pastry cutter, leaving your tian intact. Decorate with tiny dice of tomato, cucumber and black olives (see photo).
CHEFS TIPS Although we in the UK drink a lot of red Rioja, the Spanish value much more their white Rioja. A warm rustic bread such as olive bread and perhaps a chilled glass of white Rioja would work well with this dish. The crabmeat in my photo is from the Brown Cornish Crab, but you could also use white Backfin crabmeat from the Blue Crab that these days is sold in most supermarkets.
Barbecued Rib of Beef with Forestiere Sauce

Barbecued Rib of Beek With Forestiere Sauce © Kevin Ashton 2007
If you caught any of my BBQ masterclasses around the UK, you know you can cook anything from whole chickens and shoulders of lamb to pizza and cheesecake on a barbecue - if you know how to control the heat. For those that
For this recipe, your BBQ needs a lid and you'll also need a disposable aluminium roasting tray. The tray needs to be placed underneath the grill bars in the middle. If your barbecue is charcoal, place the coals
INGREDIENTS
1tbsp olive oil
1 .5kg rib (3lb) Rib of beef on the bone
100g (4oz)oyster mushrooms
1 large portabella mushroom
125ml red wine
30g (1.5 oz)butter
1.5tbsp plain flour
2 rashers smoked bacon finely diced
500ml (1pint) beef stock
1 clove of garlic, crushed
2 small shallots diced
1 level tbsp tomato puree
METHOD
- Set up and light your barbecue as per the above instructions.
- Slice mushrooms into large pieces then fry together with bacon in a non-stick frying pan, until golden brown.
- Turn the heat down, add the butter and shallots and cook until the shallots are soft. Stir in the flour and stir occasionally until the flour has lightly browned.
- Transfer the mushroom mix to a non-stick saucepan, gradually add the beef stock a ladle at a time so it stays smooth.
- Finally add the wine, garlic and tomato puree, stirring in well, then simmer for 40-50 minutes, then keep warm.
- Rub
on a little olive oil and then season the rib of beef with salt and pepper on both sides. - Position the rib of beef over the aluminium roasting tray and close lid of the BBQ. In doing this, you're creating an oven and can cook the beef to your desired taste (I prefer my beef medium rare so the beef when pressed should still have a little spring in it).
- If you have a meat thermometer, cook the beef until it reads 138F/59C (which should be medium rare).When you rest the meat the temperature will rise several degrees as the meat relaxes.The rib of beef in the picture was cooked to medium which is around 145F/63C.
CHEF'S TIPS
Allow the meat to rest on a warm plate before carving. Any juices that come out of the beef should be poured into the sauce to give the sauce a wonderful beefy flavour.
The purpose of the disposable aluminium roasting tray is to catch the fat
As you can see from the photo I like to serve this dish with dauphinoise potatoes. If you want to add a little extra smokey flavour to the beef soak 1 handful of small hickory wood chips the night before in cold water. Just before you put the Rib to cook drain the wood chips and sprinkle them directly onto the charcoal.
Polar Family Cool Bag Review

Whenever I review a product I try to judge it fairly and yet critically. In my recent barbecue article, I talk about how useful it is to have a large cool bag to avoid constantly running back and forth to the kitchen and perhaps burning your food. When choosing a cool bag for this specific job size is a very important factor, so avoid anything less than 20 litres.
Polar Luxury Family Cool Bag-Review
Design
This is a good size and well designed cool bag and a decent quality for the price.
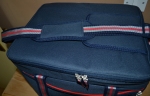
The bag arrived quite flat because there are two velcro straps that make it possible to pack it flat, which is useful for storage or even when packing into a suitcase. Additionally these straps can be put out of the way by using the other two velcro fasteners located inside the lid, so they are not just dangling around ready to catch themselves (as velcro fasteners have a want to do).
It can either be carried using the adjustable shoulder strap or the two handles can be fastened together.
This particular model has an extra access point on the top so you can get things out without unzipping the whole lid.
There is also a useful large exterior pocket for things that don't need keeping cool. It's the little touches that show the thought that went into the design.
Quality
As I said the overall quality versus price is good though it was a little stiff when I first tried to zip up this bag.
Given that the zip is positioned at the very top of the cool bag and has to go around corners without catching the lining I would advise you gently work it back and forth a few times before you use it to loosen it. The thick thermal insulation is food safe and PVC free. The lining has heat sealed seams to contain spills and for easy cleaning.
After impressing me overall, the included "free ice pack", was a bit of a letdown. I was hoping that Polar would have included a specially designed cool block that covered the base of the bag, even if this raised the price slightly.
Photo Gallery


Marks
Design 10
Quality 8
Included extras 7
Conclusion
Polar is a well-respected name in commercial refrigeration and this is a well-designed family size cool bag, especially when you are planning your next Barbeque.
Using a Cool Bag For A Barbecue
Ahead of time figure out which assortment of your plastic containers fit your cool bag to make sure you maximise the capacity of the bag. You want a mixture of sizes but try to avoid round ones as they will waste space.
Prepare your food the night before (and refrigerate). Whilst your barbecue coals are tempering, place each item of food in separate containers ie The chicken in one, vegetables in another, seafood in another and so on. Place frozen cool blocks at the bottom of the cool bag and then pack your food. Try to place the items you need first towards the top. Add any additional cool blocks if you have any room left in the cool bag. Try to keep the cool bag in the shade if possible, though a good cool bag used correctly should keep food cool for at least 6 hours. I also like to have a work table behind or next to the barbecue, which may also offer shade to the cool bag.
Always reseal the cool bag as soon as possible to keep the cold in. You can also use a little portable digital thermometer in you have any concerns. Just place the probe end into a small bottle with water in. Remember you should always keep your foods 5c or lower to keep it safe. It is also good to have extra cool blocks on standby in your freezer, if you feel the blocks in the cool bag need switching.
The Art of Cooking on a Barbecue-part 2

In part one I talked about the different methods of cooking on a barbecue, now I'm going to give you an overview of the components and their importance for a successful barbecue.
Charcoal
The two main types of charcoal are briquette or hardwood lump, some purists prefer the more nature hardwood lump. Myself I like a mix because the hardwood lump lights quicker and burns faster, whereas the briquette is harder to light but burns for longer. If your barbecue runs for a long time you may need to top up the charcoal and for this I would use the hardwood lump if possible. Remember the new coals will need to temper to get well alight before you resume cooking, or you will get a lot of soot on your food.
Barbecue Placement
Find a flat area of ground, think about wind direction because you don't want it either blowing smoke in the direction of your guests or your neighbor's clean washing. Don't place the barbecue close to the ornemental pond or you will attract too many bugs. I find that Citronella offers excellent protection against mosquitoes whether in the form of candles or torches filled with oil. Use these in smaller areas, such as on the patio while dining or entertaining.
Work Table
Is always a good idea to have a work table close by. A 6 foot table (1.8288 metres) is ideal and make sure you set it up on a stable (flat) part of the garden,so it does not tip up. I usually set up the table so as to create a L shape with grill, but not too close. If you are planing a large barbecue you might consider a second table to act as the buffet table, just make sure it is not too close to the barbecue or your work table. It is also useful to have a cutting board and a couple knives handy but remember, never cut cooked meat on a board you have been using for raw meats.

Large Cooler Bags
Good barbecuing is about controlling the heat, preparation and having things to hand. Invest in a large cooler bag (about 26-30 litre size) and cooler blocks to stop all the running back and forth to the fridge. Put your prepared food stuffs into separate plastic containers which can keep cool in your cooker bag. Make sure your cooler blocks are put in your freezer 24 hours before hand.
In warm weather don't take any raw meats or seafood outside until you are ready to cook. I like to prep everything in the kitchen then put the foods into plastic containers. The plastic containers then get put into a large cooler bag with 3-4 frozen cool blocks to keep the food nice and cold. This way you don't need to keep running backwards and forwards to the kitchen whilst your food on the grill is burning. If you're having a buffet table with things like coleslaw, potato salad etc keep cling wrapped in the fridge until you are about to serve.
Plates and Containers
Have heat proof containers to transfer cooked food into...don't put the cooked food onto plates or bowls that had raw foods in them.
Barbecue Sauce
If you wish to use a barbecue sauce don't put it on too soon. Most barbecue sauce have brown sugar, honey, or molasses all of which burn very easily. Just brush BBQ sauce on during the final minutes of cooking.
Weather Protector
The day before a large barbecue I always make a casserole type dish such as Chili or Curry you might say "It's one I made earlier". I do this for 2 reasons…..
1.) If the weather turns bad and I have to bring the guests in they can still eat.
2.) Often when barbecuing you run out of food until the next batch is cooked, so by having a ready-made dish you can offer to people who don't want to wait.
StoveTop
If you wish you can reserve part of your grill top to warm sauces etc.
Hamburgers
If making your own burgers make them several hours before hand, this helps to keep there shape and prevent them from falling apart on the grill. Make sure you have a place for keeping your grilled food hot/warm. Cook the longer cook items such as chicken before you cook the burgers. If you need to cook a large number of sausage for your barbecue consider par cooking them in boiling water (add a chicken bouillon cube if you like), then finish them on the BBQ grill.

Woodchips
You can add a great smoky taste to the food by using various types of wood chips on your grill. Probably to two best know in the UK are hickory and oak. But there are lots of others. Here is a brief list of the better know woods and the types of foods they work well with. The two important points to remember before buying wood chips are,
- The chips must be well soaked in cold water several hours before, so when they are sprinkled on top of the hot coals they smoke rather than catch fire immediately.
- Big wood chips like the ones in the photograph are meant for barbecue grills and smaller chips (that look more like shavings are meant for smokers ).
Apple Very mild with a subtle fruity flavor, slightly sweet. Good with poultry (turns skin dark brown) and pork.
Hickory Most commonly used wood for smoking--the King of smoking woods. Sweet to strong, heavy bacon flavor. Good with pork, ham and beef.
Lilac Very light, subtle with a hint of floral. Good with seafood and lamb.
Mesquite Strong earthy flavor. Good with beef, fish, chicken, and game,one of the hottest burning.
Mulberry The smell is sweet and reminds one of apple.
Oak Heavy smoke flavor--the Queen of smoking wood. RED OAK is good on ribs, WHITE OAK makes the best coals for longer burning. All oak varieties reported as suitable for smoking. Good with red meat, pork, fish and heavy game. The secret to using wood chips on your barbecue is to soak the chips the night before in cold water so they smoke rather than burn on the grill.
Clean-Up
Most of the clean up of the grill should be left until the grill is cool. But you should definitely brush the grill bars down well with a sturdy wire brush.
Children
Barbecues can be great social gatherings especially if yours gets a reputation for good food. With that in mind don't allow young children close to the BBQ when it is hot. If there is any unruly kids looking likely to cause an accident designate another adult as the safety officer to keep the kids away from the grill, after all you can't be expected to cook and watch the children.
Oven Gloves/Clothes
Its a matter of personal taste which you use but make sure you have more that one and that they stay dry. A wet oven cloth gets very hot because the water turns back into steam.

A Good Pair of Tongs
Besides the Barbecue Grill the most important piece of equipment is a good pair of tongs but that doesn't mean expensive. This particular pair are 30cm long (so long enough), they are light which makes them easy to use and best of all is the price, which is currently £1.54 from Russums plus P+P so buy a couple. Russems are a very well-known supplier of catering equipment to the restaurant business, so their prices are very competitive. I have used them for years but they also are happy to sell to the public as well. Below is a link to the tongs
Look out for final part 3, coming soon.